Wednesday, April 9, 2014


DIY HAIR EXTENSIONS

Here's a little Step by Step, repost on how I made my sister her own clip in hair extensions a little while back.


Step 1:Purchase Extension Hair. I chose Indiremi Premium Virgin Hair.  You can purchase this at your local beauty supply store.
Step 2:  Dye  extension hair the same colour as your own hair to ensure a perfect match
Step 3:  Cut the extensions to fit your head.
Step 4:  Sew the clips to the hair with a matching thread.  Extension thread is recommended but we used regular thread and went over it a few times to ensure that it was tight.
Step 5:  Clip them into your hair and style.

If you live in the Toronto area or will be in the Toronto area you can book an appointment with Rebecca at Saloniere 2470A Yonge Street, Toronto, ON via phone 416.480.0020 or contact her through email at info@saloniere.ca

Wednesday, January 29, 2014

Keep Away Those Winter Blues

Anyone else have trouble in the beauty department with this frigid weather?! I know I tend to have issues with dry skin, staticy hair, and most times just feel like my whole look is dull. So, I thought I'd allow you into some of my little secrets to help you feel and look your best until that warmer spring weather arrives!
If you're anything like myself, the constant change from warm heated air in side to cold windy outside does nothing but dry out your skin. There's nothing worse than dry skin, and no matter how much moisturizer you use it just seems to never be enough! The first thing that'll help, may be obvious, but it's seriously a life saver. The blessed humidifier!! It'll keep you from completely drying out like a fish out of water, as well as help you immensely while styling your hair and keeping that static away.
While this weather is cold, the worst thing you can do is take the hottest shower ever. Although it may feel nice, it will actually cause your skin to dry out even more, so better to stay with warmer rather than hotter. One of my favourite things to keep my skin at it's best is exfoliator. You can get them all over the place and even make your very own sugar scrubs to keep skin soft and fresh. My personal favourite is by Cake called it's a slice, not only does it smell great, but its also environmentally friendly and completely natural!
Your skin is sure to be left feeling soft and fresh! I also follow up with a cake moisturizer to keep my skin hydrated. 

Now for your face. It's super important to keep a regular skin regime, especially in the winter. Because the skin on your face is typically more sensitive, its better to exfoliate your face only about 2 times a week, and using a toner in between. I just started using a new skin care line by Kate Somerville, and i absolutely love it! Not only does it leave your skin so clean feeling and fresh, but I've also noticed a difference in the brightness of my complexion as well. That's always a good problem to have! Also, each night I use a night moisturizing mask, by Origins called Drink up intensive. It's thick, but definitely does the job! It leaves your skin feeling soft and allows your foundation to have the smoothest surface the next morning. 

Last but not least, makeup! In the dreary cold winter weather its hard to have that glow that summer always gives to your skin. Somehow in the summer everyone just shines and has that perfect dewiness, but how do you get that in the winter while your all bundled up?! Let me give you a few tips:
1) Add an iridescent shimmer cream to your foundation to give it that extra little sparkle. It'll brighten your complexion and give you a soft glow.
2) Use a highlight, such as Watt's Up by Benefit cosmetics. Adding just a little bit of this even just to your t-zone will give you that gorgeous dewy look.
3) Try a bright lip. Rather than staying away from the bright lip in the winter, pull them out and play with them. A good bright lip always helps you brighten you up, and i don't know about you but somehow it puts me in a better mood! (Also, if you're going through a break-up or a stressful time, it's way less calories than ice cream)
4) Lastly, add a little bronzer to your life. Don't go overboard so it looks like you've just come home from 2 weeks straight in a tanning bed, but add a little to your temples, and under your cheek bones. This will give you a little colour, and give the illusion that your a little sun kissed. 

I hope these tips help! I'd love to hear how you throw away the winter blues as well, so feel free to comment and let me know! 

Stay warm and beautiful!

Rebecca

Wednesday, January 15, 2014

HAIR TREND ALERT: Get the Look

Lately I've noticed a big change in where hair is going, and I'm loving every second of it!! While we are still into soft waves and centre parts, the trend seems to be changing slowly to something a little sleeker, edgier, and equally as sexy. Watching the Golden Globes this year really reinforced my trend instinct as I saw just what I had predicted walk down the red carpet on actress after actress. Nothing more than gorgeous silky straight hair with an exaggerated side part! Not only is it runway worthy, but its the complete opposite of our beachy waves that we've seen for the past few years and it's so refreshing. Don't get me wrong, I still love the beachy waves every now and then! Here are a few I thought did it best


It's an effortless look that each of these girls wore beautifully, and made them incredibly hot on the red carpet!! 
To get this look: In towel dried hair use a walnut size pump of Oribe Grandiose mousse from root to ends. Then a pump of Kerastase Gold Elixer from mid shaft to ends. This is the perfect blend to give you a little bit of lift at your part and sleek silky ends. Blowdry your hair with a natural bristol brush until smooth. 
I use the GHD classic flatiron for all my straight looks and find it does an amazing job! Before you flat iron use a pump of Cristalliste Crystal Sculpt Oil by Kerastase from mid-shaft to ends to ensure the shiniest sleekest iron job. This product will even out the porosity from root to ends leaving your hair looking the healthiest its ever been, and its weightless so you don't have to worry about feeling greasy or heavy. Who doesn't love that?! Your Flatiron will infuse the product into your hair and have you addicted!
Then to finish and ensure it stays, use Oribe Super Fine hairspray and away you go! You'll definitely turn heads with this glossy gorgeous style that'll last you all night long!!

Stay tuned for more looks, tips and tricks :)

Rebecca the hairstylist  

Saturday, December 21, 2013

Putting It All Together

Can you believe that Christmas is only 5 days away?! I know I can't! With Christmas and New Years arriving quickly, I have many opportunities to doll up and look my best, but with so many parties it's hard to figure out what to do with your hair, makeup, and then having to pick out different outfits. (You know, a woman can never repeat a party outfit, especially in the same year, and same month, that's unheard of!)
So, to help you out a little bit, I have some tips and tricks ad this seasons hottest trends to help make you the sharpest at every event.

First you must start with that outfit, the aesthetic of your dress depicts where your hair and makeup is going to go.  Here are some of my favourite party dress looks: 


Next is hair, which in my opinion is just as important as your earrings or shoes. Even if I'm not wearing any makeup, I always feel pretty so long as my hair looks good! With your do, figure out what your outfit is portraying, whether it be funky or soft and sexy, modern, or classic etc. it is important to mimic that in your hairstyle. Once you've decided on the type of look, you then look at the neck line of your outfit and decide what you want to show off. For example, if you're wearing a backless dress you'll either want to wear your hair up, or off to the side so as not to cover up the detailing. To help you out, here are a few hairstyles that would accentuate each outfit I showed earlier:

Last but not least, and most definitely my favourite is makeup!! This is where you get to have fun, and while on a day to day basis there are rules, for the Christmas season I go with whatever makes me feel good! I like to bend and break rules in this department all the time, as long as your makeup isn't arriving to the party before you! Here are a few of my favourite looks for this holiday season!!


Wait! We can't forget accessories! Christmas and New Years is all about glitz and glam, so make sure it's sparkly but don't over do it... Even if you decide to forego the necklace and highlight your collar bones with a shimmer body cream, it's touches like that that will cause you to stand out among the crowd! Take a look at some of my personal holiday looks!

Hope everyone has a wonderful Christmas and New Years!!

Monday, November 18, 2013

Finding the Perfect Outfit for that Special Occasion

For me it is always the hardest to find the perfect dress or outfit for something special. I always want to stand out, and make an impression, but sometimes what I have in mind and what are in the shops just don't cut it. It never seems to turn out that I have this creative thought of an outfit, and then I walk into a store and it is magically waiting for me on a rack with the price tag that is just right and screams my name. Unfortunately I think that is the case for everyone, and whether or not you are prepared to sew it yourself, we get caught in this dilemma time after time. How hard is it to be a girl eh?!
In having this problem copious times before, I have come up with a few tricks and tips to help you along the way and make sure you look the best you possibly can.

The first thing you need to think about is your outfit... figure out how dressy or casual you are meant to be, whether you want a dress (what length and shape... strapless, sweetheart etc) pantsuit/ romper etc... once you have that, think about colours that would best suit you... I always keep a few colours in mind as you may not find your most ideal colour, that way you lessen the heartache while shopping. By knowing the type of outfit and colour scheme it helps so much more in the whole process, and there is half of your battle. Also what can help is finding a picture in a magazine and reinventing the look with your budget and resources... I find this helps a lot.

Once you have that done and bought you can now work on your accessories. Remember that sometimes 'less is more', in many cases you can let the neckline of a dress speak for itself, and instead do some chunky bangles, or a pair of chandelier earrings to add a little bit of sparkle.
Also, don't be afraid to try something new with your hair and makeup to play up your look. I love looks where the outfit is really minimal, but dramatic hair and makeup play it up and completely altar it.

ps. don't be afraid to try on things that you normally wouldn't, sometimes those turn out to be the pieces that blow you away the most... try to make it as enjoyable as possible!

Wednesday, October 23, 2013

Fall Fav's

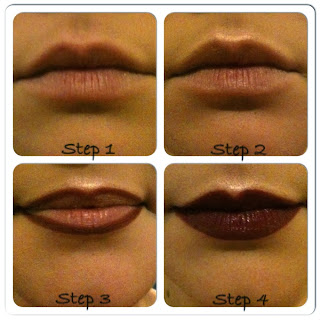
I’ve decided to do a little step by step to show you some of the products I use to achieve the “no makeup” look with a dark lip as I talked about in my previous blog. I’ve recently found a couple new products that I just cannot get enough of!! The first one is called “watts up” by Benefit. For me this is a definite must have in anyones makeup kit, especially if you want that healthy looking glow to your skin. I don’t know about you, but who doesn’t like that dewy Jennifer Lopez glow?! Thats all I ever want, and this product is perfect in achieving just that! 
My second new fav product is Blinc mascara... this stuff is amazing! Not only is it waterproof, but when you wash it off at night it just slides off without leaving any residue at all!! I hate looking like a raccoon when i wash my face, but amazingly this stuff doesn’t do that at all. I also love this mascara for the ‘no makeup’ look because its super natural and almost doesn’t look like you’re wearing mascara at all. 


Now for the most important part, the dark lips... I use the Mahogany lip pencil, and the Mattene Lipstick in Rougette by MAC. The key to having the most crisp lip line is to start fresh by concealing over your natural lip line... I even like to go over the centre part of my lip line, on top and bottom with the watts up just to make your smackers appear more full when the light hits them. I always start by creating an x at the bow of your lip and working your way out. I always like to fill in the corners of my lip with the pencil just a tad to give them a more ombre effect. If your really adventurous you can even try using a black eye pencil to line your lips and blending it with a red for a darker more plummy lip. Once you’re all lined fill in with your lipstick and smack them together just to blend a little more... I find if i get my fingers in there I always smudge something and it creates a lot more problems. 


Have fun playing with darker lip colours!! I’d love to see what you come up with so tweet rebeccahgod, instagram rebehg, or facebook me at Running with Scissors :) xo

Monday, September 16, 2013

Hey Blog world!!

It feels like Fall is upon us... Crazy how fast the Summer goes, and before you know it we are pulling out jackets and scarves again! I don't know about you, but I like to revamp everything as soon as the weather starts to change, including my makeup and hair... It makes me feel like everything is starting fresh!

New York Fashion Week just ended, I love to keep track of whats going on and see whats walking the runways to pull different aspects of it and apply it to my own personal style. What I loved most about this years runway was the hair and makeup, not only was it undone and fun, but totally achievable for the everyday person. Whether its the brushed out curls, or the 'no-makeup' look with a dark lip. Lately I'm obsessed with this look!

Here are a few looks that I cannot wait to try, and maybe I'll just show you how I achieve them :)